Problem
You’re developing on Windows and have an existing Emscripten project that builds and runs from the command line, but you’d like to do this from the CLion IDE.
Solution
Pre-requisites
- Your project builds from the command line with
emcmake. See How to use Emscripten with CMake on Windows for details. - You have a working knowledge of CLion.
Open the project in CLion
In CLion, go to File -> Open… and open your project by selecting the directory containing CMakeLists.txt.
CLion will detect CMakeLists.txt and attempt to load it with CMake, using its default toolchain. On my Windows dev box, this is MinGW, so that’s what I’m showing here.
If CLion already has a MinGW toolchain configured, then you will see output similar to the following in its CMake tool window.
C:\Users\Rod\AppData\Local\JetBrains\Toolbox\apps\CLion\ch-0\201.6668.126\bin\cmake\win\bin\cmake.exe -DCMAKE_BUILD_TYPE=Debug -G "CodeBlocks - MinGW Makefiles" D:\Users\Rod\Projects\c++\demo
-- The C compiler identification is GNU 7.1.0
-- The CXX compiler identification is GNU 7.1.0
-- Check for working C compiler: D:/Tools/emsdk/mingw/7.1.0_64bit/bin/gcc.exe
-- Check for working C compiler: D:/Tools/emsdk/mingw/7.1.0_64bit/bin/gcc.exe -- works
-- Detecting C compiler ABI info
-- Detecting C compiler ABI info - done
-- Detecting C compile features
-- Detecting C compile features - done
-- Check for working CXX compiler: D:/Tools/emsdk/mingw/7.1.0_64bit/bin/g++.exe
-- Check for working CXX compiler: D:/Tools/emsdk/mingw/7.1.0_64bit/bin/g++.exe -- works
-- Detecting CXX compiler ABI info
-- Detecting CXX compiler ABI info - done
-- Detecting CXX compile features
-- Detecting CXX compile features - done
-- Build type: CMAKE_BUILD_TYPE=Debug
-- Compiler: CMAKE_CXX_COMPILER=D:/Tools/emsdk/mingw/7.1.0_64bit/bin/g++.exe
-- Compiler id: CMAKE_CXX_COMPILER_ID=GNU
-- Compiler flags: CMAKE_CXX_COMPILE_FLAGS=
-- Compiler cxx debug flags: CMAKE_CXX_FLAGS_DEBUG=-g
-- Compiler cxx release flags: CMAKE_CXX_FLAGS_RELEASE=-O3 -DNDEBUG
-- Compiler cxx min size flags: CMAKE_CXX_FLAGS_MINSIZEREL-Os -DNDEBUG
-- Compiler cxx flags: CMAKE_CXX_FLAGS
-- Library Type: LIB_TYPE
-- Configuring done
-- Generating done
-- Build files have been written to: D:/Users/Rod/Projects/c++/demo/cmake-build-debug

[Finished]
If this is the case, then you probably don’t need to configure the MinGW toolchain. Skip ahead to Configure the build.
Otherwise, you do need to configure the MinGW toolchain in CLion, so continue reading.
Configure the MinGW toolchain
Open the CLion settings window by pressing Ctrl+Alt+S, then navigate to Build, Execution, Deployment –> Toolchains.
Click the + to add an environment and select MinGW from the drop-down.
-
In the Name: field, type something unique to identify the toolchain, such as “MinGW for Emscripten”.
-
In the Environment: field, put the path to your MinGW installation. If you don’t have one then you can click the Download button, or install one via the Emscripten SDK as described in How to use Emscripten with CMake on Windows.
Once you have entered a valid path in the Environment: field, then CLion will try to populate the Make:, C Compiler:, C++ Compiler:, and Debugger fields.
You should end up with something like this:
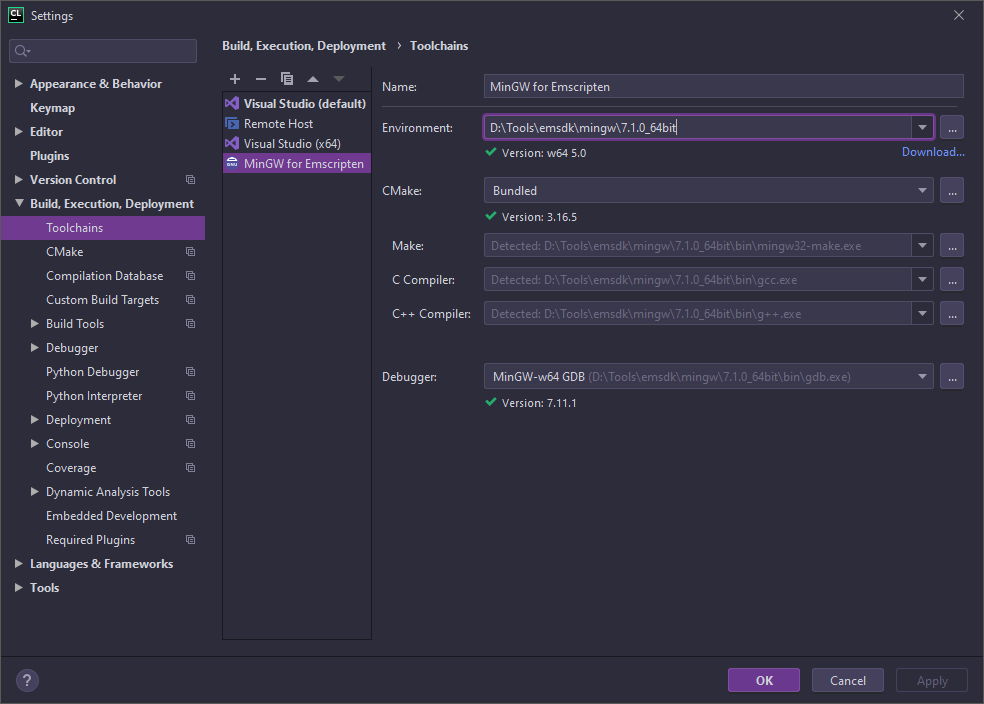
Figure: the CLion Toolchains window
Click OK to dismiss the window.
Now CMake will run again. It will probably fail with an error, because you still need to tell CLion to use your build directory.
Configure the build
Open CLion’s settings window by pressing Ctrl+Alt+S, then navigate to Build, Execution, Deployment –> CMake.
-
Go to the Toolchain: field and select your MinGW toolchain from the drop-down.
-
Select the Generation path: field, then enter the path to your project’s build directory. This is the directory that CMake generated when you ran
emcmakefrom the command line, such as “cmake-build-emscripten” as shown below.
The window will look something like this.
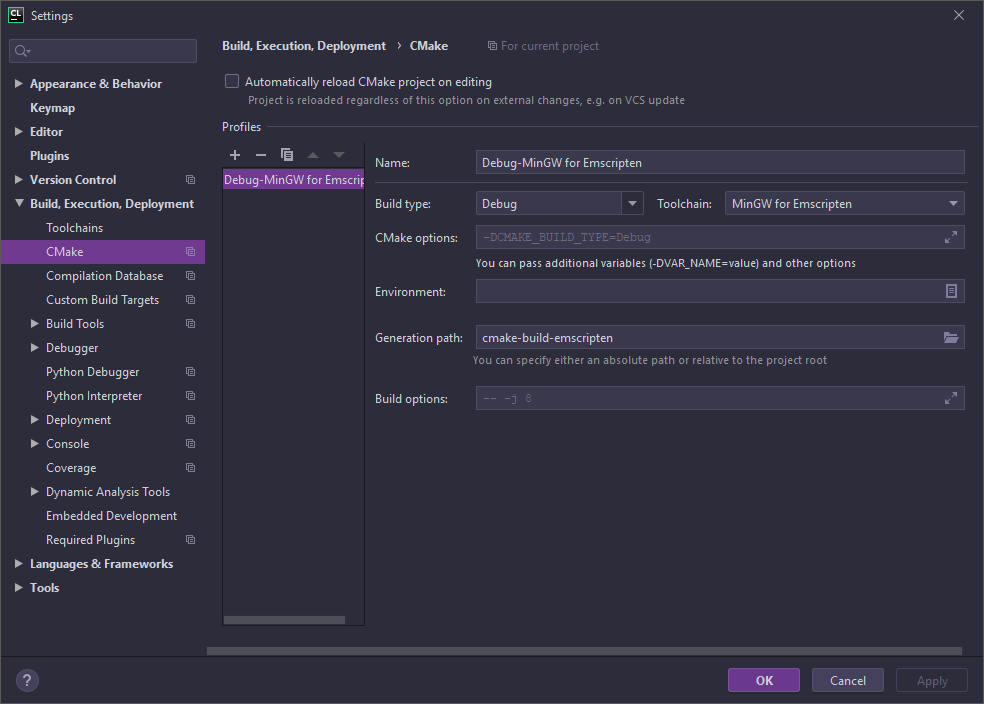
Figure: the CLion CMake window
Click OK to dismiss the window.
CMake will run yet again. This time it should show the same output that you would see if you had you run emcmake from the command line.
C:\Users\Rod\AppData\Local\JetBrains\Toolbox\apps\CLion\ch-0\201.6668.126\bin\cmake\win\bin\cmake.exe -DCMAKE_BUILD_TYPE=Debug -G "CodeBlocks - MinGW Makefiles" D:\Users\Rod\Projects\c++\demo
-- Emscripten detected
-- Build type: CMAKE_BUILD_TYPE=Debug
-- Compiler: CMAKE_CXX_COMPILER=D:/Tools/emsdk/upstream/emscripten/em++.bat
-- Compiler id: CMAKE_CXX_COMPILER_ID=Emscripten
-- Compiler flags: CMAKE_CXX_COMPILE_FLAGS=
-- Compiler cxx debug flags: CMAKE_CXX_FLAGS_DEBUG=-g
-- Compiler cxx release flags: CMAKE_CXX_FLAGS_RELEASE=-DNDEBUG -O2
-- Compiler cxx min size flags: CMAKE_CXX_FLAGS_MINSIZEREL-DNDEBUG -Os
-- Compiler cxx flags: CMAKE_CXX_FLAGS
-- Library Type: LIB_TYPE
-- Configuring done
-- Generating done
-- Build files have been written to: D:/Users/Rod/Projects/c++/demo/cmake-build-emscripten

[Finished]
Build your project in CLion
You can now build your Emscripten project in CLion by pressing Ctrl+F9.
Run your Emscripten project
To run your Emscripten project, you will need a web server that knows how to serve .wasm files as application/wasm.
Here’s a short Python script that will do the job.
#!/usr/bin/env python3
# Serve ".wasm" files as "application/wasm".

from http.server import SimpleHTTPRequestHandler, test

if __name__ == '__main__':
    import argparse

    parser = argparse.ArgumentParser()
    parser.add_argument('--bind', '-b', default='', metavar='ADDRESS',
                        help='Specify alternate bind address '
                             '[default: all interfaces]')
    parser.add_argument('port', action='store',
                        default=8000, type=int,
                        nargs='?',
                        help='Specify alternate port [default: 8000]')
    args = parser.parse_args()
    handler_class = SimpleHTTPRequestHandler
    handler_class.extensions_map[".wasm"] = "application/wasm"
    test(HandlerClass=handler_class, port=args.port, bind=args.bind)
If you want to run it from within CLion then…
- Add it to your CLion project.
- Right-click on it in the Project view, and select Create ‘run_server’…
- In the window that appears, set the Parameters: field to -b localhost.
- Select a Python interpreter:.
- Set the Working directory: field to your project’s target directory.
- Click OK to close the window.
You should now be able to start the web server from within CLion by selecting the run_server configuration and pressing Shift+F10.